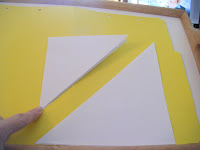

You can use any type of paper you wish. I have used printer paper, stationary, construction paper and even wrapping paper. You can use anything you can cut and fold . You first start out by cutting paper into a square, then with a square piece of paper fold in half then fold in half again. You will need 6 squares to make one snowflake.
 With the open folded edge on bottom hold closed folded side at point and make cuts up to an imaginary line approx 1/4 in from edge. Make sure to not cut completely to edge. If you are using a full sheet (8 1/2 x 11) you can make 3-4 cuts depending how much detail you want. If you use any smaller sheets then 3 cuts are the best to do as you don't want the slits to be to small as it will make the snowflake flimsy. I have also made the cuts using my craft scissors. This will give your snowflake many different designs.
 After you have made your cuts then open up your square and fold the middle into a tube and tape together. Then turn over square and take next set of cut pieces and fold together and tape, turn over again and repeat till all the pieces are taped together.
 This is what your piece should look like when all the pieces are taped together. Repeat will all 6 squares.
 Making sure that all the middle tubes are going in same direction, take 3 of the pieces and staple together on one end. Then tape the pieces together on the outside strips of each piece as seen below.
 Close up of how I tape pieces together.
 Close up of how I staple ends together. Repeat with the other 3 pieces of paper in same manner as 1st 3.
 Staple the 2 bunches together making sure the tubes in middle are still going in the same direction as shown above.
 This is your end result.It looks like there is a big gap in the middle but there isn't. It's just the way I photographed it. I should have turned it the other way but didn't notice it till after I posted this. I usually put a few pieces of tape folded over a point from where I will be hanging these with some thread. That way the paper doesn't rip and it just gives it a little more reinforcement.
I hope this is an easy to follow directions to make these snowflakes. I did try and video myself making these but I just couldn't get it right. Here is a website that I did find today that shows someone making the snowflakes and another one showing steps. It is a little different in the way they cut the slits and how they hook it all together but you will get the idea. I only use the stapler to hook the groups together as I don't want all those staples showing.
http://www.youtube.com/watch?v=ausJdGcgs0k
http://www.wikihow.com/Make-a-3D-Paper-Snowflake
Enjoy and have fun. If you have any questions please don't hesitate to message me and I will do what I can to help. This craft is an easy one for kids of all ages to make. Use your imagination and have FUN.

1 comment:
Is this my Memo? I shall get some snowflakes made...soon.
Post a Comment